Social skills and interaction
Social skills include the ways in which we use both language and non-verbal communication such as gestures, facial expressions and body language to communicate and interact.
About social skills and interaction
Social skills include the ways in which we use both language and non-verbal communication such as gestures, facial expressions and body language to communicate and interact. Expectations on what social skills are appropriate to a situation varies in each different social situation. This section includes relevant resources and advice to support the development of social skills.
Lots of children find it difficult to learn to talk and interact, for lots of different reasons. If your child can’t talk yet, communication can and will still happen. Supporting communication at the right level for your child can really help them to learn the skills they need to communicate more. This section contains ideas to try if your child is finding verbal communication or social interaction difficult.
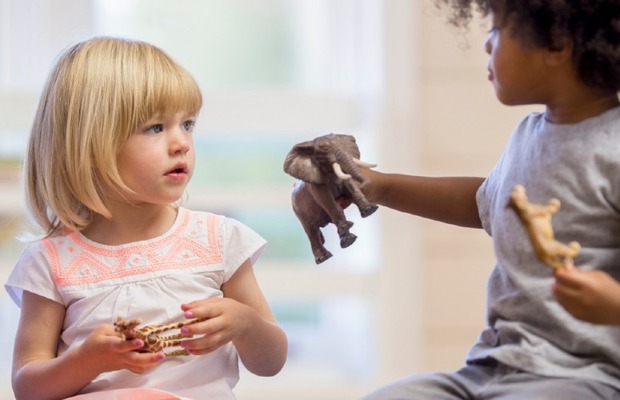
Not all children find interacting with other people easy. There are lots of different reasons for this. All children can build on their interaction skills with support.
Being together and sharing space can be so valuable, without a plan to teach anything. Skills will build gradually and naturally.
The most helpful thing to try is joining in with what your child is interested in (whatever it is!).
Try not to imitate everything, like a mirror, but match your activities together, sharing your attention to the same things.
Don’t worry about eye contact if it is difficult at the moment. We can communicate well without eye contact and it’s okay if it’s difficult – focus on other parts of interaction to begin with.
Things to try
Great ideas for people games are:
- peek a boo
- making funny faces
- tickling
- chasing
- physical fun like bouncing and swinging
- turn-taking games
Action songs are great for building interaction, repetition can become familiar and reassuring. Try pat-a-cake, row row your boat, if you’re happy and you know it.
Ideal objects are bubbles, balloons, balls, cause and effect toys (simple slides, lights and sounds), and first musical instruments.
“Burst pause” sequences can help build anticipation of interaction, and engagement. These are when you do something that engages your child, then hold a pause for a prompt to do it again.
Ready, steady………. Go!!!!
Waiting for your child to prompt you to do something more is a great way of teaching them that communicating gets good things!
Good activities for this are hiding games, tickling games, ready steady go, making interesting sounds, or trying pausing in between a line of a favourite song, join in with what they enjoy.
Accept any form of response, a movement, a sound, a facial expression or a look, and treat it as a request to do it again. If you don’t get a prompt at all, carry on, it’ll come!
Repeat activities over and over again, it may feel boring, but familiar activities really help children to learn skills. Routines can be very reassuring.
Keep it fun! If you show that you are enjoying an activity, this helps make the interaction more successful, keeps it going and demonstrates the skills you want to build.
Intensive Interaction is an approach to interacting with, and teaching early communication and interaction skills, to those who do not find it easy communicating or being social.
Intensive Interaction aims to develop the fundamentals of communication such as:
- enjoyment of being with another person
- sharing personal space
- understanding and use of eye contact
- turn taking and shared enjoyment
- using vocalisations with a purpose
- developing attention and concentration
- understanding and using physical contact
- understanding and using facial expressions
- understanding and using non-verbal communication
Intensive Interaction should be used in a relaxed environment with the ‘teacher’ (parent, carer, key person) following the lead of the ‘learner’. By following their lead and being involved in what the learner is involved in (for example, building a tower, using musical instruments), it is more likely that both the teacher and learner will have a more successful interaction. If brought away from an activity or area that they are particularly enjoying and engaging in, the learner may be reluctant to interact with the teacher or the new activity.
Examples of Intensive Interaction may include:
- copying vocalisations
- copying actions
- clapping hands together
- taking turns to place bricks on a tower
- copying or taking turns during active play, for example, jumping, running
- rolling a ball back and forth
- sitting close together
- playing a game of peek-a-boo
- physical touch such as hand or foot massage
An Intensive Interaction may come to a natural end when the learner is no longer engaging in the session, or it may require the teacher to formally end the session.
It is helpful to practise the approach little and often. This helps the teacher to gain confidence and allows the learner to become used to the interactions without becoming over stimulated.
Further information, including video clips demonstrating the intensive interaction approach.
Multi-modal communication means using more than one way to communicate.
All children are unique and communicate in their own ways, and all ways to communicate are equally valuable!
Not everyone:
- talks to communicate
- talks all the time
- can say enough to share all the information they need to
Multi-modal ways to communicate can include:
- Body movements, gestures, signs and actions
- Facial expressions and tone of voice
- Sounds and vocalisations
- Singing
- Speech
- Writing and drawing
- Assisted communication with symbols, boards or electronic aids
Using more than one way to communicate can help us connect. Tuning in to find the communication methods that work for your child, and that use their strengths, can be the starting point to building your child’s skills and supporting their wellbeing.
We all use visual supports like symbols, signs, lists and clocks. Visuals help everyone to communicate.
Visuals can be used to help your child to understand what you say
Visuals engage different parts of the brain than words do, presenting information in a way that is easier to understand.
They stay there longer than words and give more time to process information.
Visuals can make situations more predictable and easier to cope with.
They can provide reassurance when communication is difficult and can make it easier for your child to participate in activities.
Visuals can be used to help with expressive communication, your child’s voice
Visuals can help your child learn to communicate and may provide an easier way for them to express themselves.
We also call this AAC (Augmentative and Alternative Communication), and it can make communication more motivating. You can’t use visuals to force communication, your child will use them when they’re ready if given the opportunity. You can provide opportunities by using visuals in your daily routines.
Visuals can also be useful when a child knows lots of words but struggles with how to use them to communicate.
Objects of reference are objects which are used to represent a person, place, or activity, and provide a visual clue about what is going to happen. They “stand for something” in the same way that words or signs do.
We all naturally use objects to convey information, for example, every time you hand your child their coat, it is communicating that you are going outside. This is similar to using objects of reference, but it uses objects in a more structured way. Children have their own set of objects which can be used to represent different things.
Example
When taking your child to go swimming, before you go show them the object you have used to represent it, such as a towel.
Let them hold it and give them time to feel the object.
This object will help your child to understand that they are going to go swimming. Over time as this is repeated, they will associate the towel with going swimming and will know it is going to happen.
Using objects consistently as objects of reference can have many benefits, including an impact on:
- Behaviour: Knowing what is happening next can reduce anxiety, fear, and frustration.
- Multisensory skills: Objects of reference encourages children to explore the object using all senses (touch, smell, sound, sight).
- Object recognition: Children start to recognise and differentiate between objects using their senses.
- Association: Children begin to develop the ability to associate objects with a specific activity, place, or person.
- Understanding: Over time, children will begin to understand what the object stands for which will help them feel more secure and confident in understanding daily routines.
- Expression: If children learn the meaning of the objects quickly, they can also use the objects to make requests and or choices. This can increase independence.
Choosing your objects
Think of what objects you can use to represent the different activities you typically do in your day. You can use objects around the house. Choose one object to represent one activity.
Objects can be an item that is used in the activity (for example, spoon), a part of the actual object (for example, piece of a towel), or a miniature object (for example, toy car).
Objects should be safe, durable, portable, hygienic, replaceable, and inexpensive.
Here are some suggestions of the types of objects to use. However, objects should be unique to your child so don’t feel like you have to choose these specific objects. Find something that works for you and your child.
Activity |
Object |
| drink cup | bottle |
| mealtimes | spoon, plate, bowl |
| bedtime | pyjamas, teddy |
| going in car | keys, seatbelt strap |
| swimming | towel, armband |
| shopping | bag, cooling rack (similar to shopping trolley) |
Try to keep the objects in a specific location such as a box, a bag, or hang them on a wall when they are not in use. This makes them easily accessible.
You can attach a symbol or picture that represents the activity to the object, or you can just use the object.
Using the objects
The object must be used consistently and repeatedly every time you do that activity. Your child will not understand at first, but over time they will begin to associate the object with a certain activity. It will become meaningful for the child. They will start to form a strong link between what you are saying, what you’re showing them, and what they do next.
Before the activity
Before an activity, give your child the specific object to hold. Use a sign or speech, for example, “it’s dinner time”.
Allow them time to explore it and talk to them about what it means.
After the activity
After the activity is finished, put the object away. Try to draw your child’s attention to the fact that the object is gone and therefore the activity has finished, for example, “dinner finished”.
Objects should be accessible so that your child could use them to communicate as well.
We’re not born understanding symbols, we all need to learn to recognise them!
First, your child might need time to associate symbols with the things they mean.
Seeing a symbol for bubbles every time they see the bubbles is important, and they may need to see it lots of times before they understand it.
Try matching some symbols to things that motivate your child, this could include things like songs, snacks or favourite activities.
Some symbols are easier than others, a symbol for a banana might be obvious, but a symbol like “more” can be harder and may take longer to understand.
Next, your child may need to learn how to use a symbol to ask for something, they have probably never seen people asking for things with symbols, and some children find it hard to understand how to ask.
Model using the symbol yourself when you know they want something, simply tap the juice symbol when you say “you want a juice?” for example.
Model with no expectation, just have the symbols available and keep modelling , your child will use them if they are ready.
Once your child understands symbols, you can move towards making choices with them to extend their opportunities to communicate.
If your child has difficulty using symbols in the way you’re expecting, that is okay. Keep modelling and ask your SLT for further advice at your next appointment.
Modelling simply means demonstrating or showing, without any expectation to respond. This might be single words, phrases, or pointing to, tapping visuals.
Communication boards, or aided language, can be used to show your child a new way to communicate.
Pointing to, or tapping, the symbols while you talk helps your child to see and hear your language at the same time. Using an interesting tone of voice can help to get their attention. Using visuals can help your language to be more repetitive which helps understanding.
Communication boards can include the names of the activities or objects, words relating to the activities and also other words or phrases that your child might want to use. Words that can be used across many different situations are called “core vocabulary” and are really useful words to learn! It is a good idea to include some words and phrases they already use, as well as new ones.
Your child may try pointing or tapping the visuals too, they may try talking, or they may not be ready yet.
It is important to remember that we can create opportunities to communicate using visuals, but we can never force communication, it’s a natural process that will happen when your child is ready.
Some children find communicating with others very difficult and all children develop their communication skills differently, be patient and celebrate even the smallest steps of progress!
Top tips:
- It’s always tempting to try and teach your child new things, but it’s best to use this alongside things your child already enjoys, this makes it more motivating for them!
- Think about communication from their perspective, think about what they might want to say
- Repetition, repetition and more repetition!!!!
As adults, we make choices throughout the day: what we want to wear, if we want tea or coffee, where we want to go. Children need to learn how to make a choice so that they can tell us what they want, become more independent and less frustrated. Giving a choice also allows your child to listen to new words and begin to learn what they mean.
Children can sometimes find making a choice difficult and this leaflet contains steps to work towards being able to make an independent choice. The easiest way to do this is to start with an easy choice (imagine being asked if you want chocolate or fish on your ice cream!) and gradually make it more difficult.
Before you start
- It is important that you know what your child likes and does not like (which can change all the time!)
- Remember that communication is not just about ‘talking’. It may be signing, an attempt at a word, a noise, a gesture, or any other attempt to get your attention. All of these are ways that your child can tell you what they want.
- Give your child time to think about the choice and answer you. This might take a while, but try to give this time when you can.
Choice with toys or items
- Choice of two toys: one should be a toy your child really enjoys playing with and one should be a toy your child isn’t interested in.
- Hold out the toys one in each hand and name them for example “ball or sock?”. Move the object slightly as you name them to allow your child to understand which one you are talking about.
- Wait for a response from your child before giving them the toy they want. A response may be your child looking, reaching out, making a sound or a change in body movement.
- No matter how your child chooses, acknowledge this by giving them the item they have shown interest in straight away, and repeat the word for them to hear, for example,“ball!”
- Make sure the favourite toy is not always in the same hand. This allows your child to look at both choices equally.
Choice with food
Please follow the same steps as above for choices with food:
- Making choices with food should be away from meal times. Snack time could be a good time to do this
- Break up food into smaller pieces so that you can practise offering a choice more times.
- Offer choices in a bowl, you could also offer a choice of colour bowl
When your child is able to make a choice between something they like and something they don’t like, try to make the choice more difficult
Making a choice with two items your child likes
- Hold out the two choices and name them, “cars or bubbles?”. Give your child time to make a choice and watch carefully for their response. As soon as they have made a choice, give them the item they have requested.
- What to do if too difficult, it might take time for your child to understand as they are both appealing options. To make this a little easier try choosing an item they always choose vs an item they may only sometimes choose.
Making choices with photos or symbols
You can use individual symbols, or choice boards. Boards can be fixed, or have choices that can be changed.
Start small offer a choice between two items to begin with. Your child can choose in any way, tapping, pointing or removing symbols to give to you.
Your child often won’t have seen these being used before, demonstrate making a request alongside your child’s interests, if they reach for a banana, you can model tapping the picture alongside.
Your child might find this hard. Making choices between objects can be an easier first step.
- Make sure they know what each symbol means, link it with the real object
- Try not to prompt your child to use the board, let them choose when to use it.
- Make sure the choices are available so you can respond to their request.
- Try to respond to all attempts to communicate if you can, communication should be a positive experience for your child.
- If you can’t give them something, remove the symbol and replace it with something they can have.
- Learning to say the word is not essential for communication, accept any way they use to communicate. Any successful communication will help your child to learn how to make requests and get their needs met.
Try using more choices in different situations, or adding more options
Symbols can be used to help your child understand what is happening, and what is coming up next.
This can make things feel more reassuring and predictable.
Now and next (or first-and-then) boards can be used to help your child understand simple routines, and prepare for what is happening next.
Place both symbols on the board to start. Remove the “now” symbol when it is finished and move the second symbol to the “now” position. Then add a new “next” to move on.
Use consistent language alongside the board, for example, “washing finished, now dry”.
Give lots of opportunities to practice using the board with simple games such as bubbles and balls.
Top tips:
Help your child to engage with the now and next board by matching to the activity that they are doing, rather than using the board to get your child to do something they don’t enjoy.
It can be helpful to introduce now and next with smaller steps that always follow each other, such as “socks, then shoes”, “lay the table, then lunch”, “bath then dry”.
Both the now and the next should be fun and motivating for your child. The boards are simply used to help your child understand, if they don’t want to do the activities, they will not want to use the boards!
Plastic zipped wallets make a good now-and-next board as they are portable and you can keep the symbols inside.
It’s useful to have a clear place to put the symbol when it is finished – this is a further visual support that an activity has ended.
Always give the “next”, even if they only briefly attempt the first activity, this helps to reinforce the idea that “next” always comes afterwards. Now and next is useful for recognising predictable sequences, and should not be used as a reward system for behaviour or co-operation.
If your child finds this difficult, break it down into smaller steps. Use one symbol at a time, just have the symbol for what they are doing now, then practice “finished” before looking at the next symbol. “Now timetables” and giving information one step at a time can be really helpful for children who struggle to understand, or children who have difficulty focussing their attention.
Visual timetables can be created using photographs of symbols of events. They are used to help children understand what they are doing over a period of time. They give structure and can help to reduce anxiety levels.
They can be beneficial for all children (just as all adults use diaries and planners), and are particularly useful for children with language processing difficulties, attention difficulties, memory difficulties and for children who are learning English as an additional language, where the visual images can support understanding.
They can be created for a whole day or to help make clear the order of events for a certain activity, for example, getting ready for PE or going to the toilet.
Creating a visual timetable
You can use symbols or photographs. Make sure that your child understands each symbol before expecting them to follow a timetable, associate the symbol with what it represents frequently.
It is useful to laminate the pictures and use Velcro or adhesive to attach them to a strip on the wall or on the table. This will help by making it easy to move the pictures around and change activities.
Display the symbols either from top to bottom or left to right in the correct order.
Refer to the timetable as often as you can.
Usually, show the whole timetable at the start of the day, then point to the relevant picture before you start each activity and when moving to a new one. A way of identifying what you are doing now, such as a frame that moves along the pictures, can be very useful.
Social StoriesTM were originally created by Carol Gray in 1991 and are widely used to support social understanding in many different contexts. They are about specific events or situations, with information about what to expect and what to do. Stories should be tailored to the individual, taking into account their own needs, and their own interests.
Social stories can help in situations that are difficult because they are concrete, they increase structure and predictability and can reduce anxiety.
It should be noted that there are specific criteria for what is a Social StoryTM and the trademarks are owned by Carol Gray. Information about Carol Gray Social Stories .
Social stories could be used in all sorts of different situations, for example, bedtime or school time, social interactions, or before a significant change to a routine. Specific examples of social stories and support on how to use them can be found widely on the internet, or by asking your speech and language therapist.
Writing a social story
A helpful story has a clear specific goal, identify the situation that is difficult, and the key features of the situation, where does it happen, when does it happen, who is involved, what happens?
It should be written from the child’s perspective, using positive language in the first person (for example, “I”) and in the present tense.
There are several different types of sentences that can be used:
- descriptive sentences: these describe the situation, for example, “I love to play with the fire engine”.
- directive sentences: these tell the child what they should do in this situation, for example, “When someone is playing with the fire engine, I can say, ‘Can I have the fire engine please?’”.
- perspective sentences: these describe how other people will feel, for example, “Other people want to play with the fire engine too”.
- affirmative sentences: these express a shared social value or opinion, for example, “It is okay to wait”.
- control sentences: these identify strategies that the child can use to remind himself how to behave, for example, “I can play with the fire engine when someone else puts it back in the box”.
- cooperative sentences: these can explain who will provide help and how, for example, “My teacher will help me stay calm while I wait for my turn”.
Social stories should be encouraging, there should be at least double the amount of describing sentences (descriptive, perspective, affirmative or cooperative) than there are coaching sentences (directive and control).
You can use words like “sometimes” or “usually” when outcomes are not always the same.
A story should be at the right level for the child to understand and include pictures and visual support to help understanding.
It should take into account why the child might have difficulty in the specific situation.
Social stories don’t need to be professionally produced – they can be written at home, with your own drawings.
Recommendations for success when using social stories
Try a simple story about a non-challenging issue to begin with, rather than tackling a big battle. This helps the idea of a social story to become reassuring and comforting.
Social stories should never be used as a punishment for misbehaviour, as this associates the stories with negative feelings.
Present the story to the individual at a time when everyone is feeling calm and relaxed. This will maximise the individuals learning and help the person to develop positive associations with the story.
Introduce the story using simple, clear language, for example, I have written this story for you. It is about thunderstorms. Let’s read it together now. Soon we will review it.
Review (read) the story as often as required, some social stories can be reviewed initially once a day, and others immediately before the situation for which they were written.
Be positive, reassuring and patient when reviewing the story and ensure the environment is quiet, comfortable and free of distractions.
Involve others in the story where appropriate. For example, a story that is focussed on a situation or activity at home might also be reviewed with the child’s teacher or learning support assistant. You might use the same stories, or different stories in different settings, but it may help to keep the structure and presentation similar to maintain familiarity.
Introduce one story at a time to make sure the child does not become overwhelmed with information.
Fade out the story by either reading less often, or re-writing parts of it to include new skills (or leave gaps for the child to complete themselves). Remember that change can sometimes be distressing, some people keep a folder of stories to add to and keep the previous ones available.